I personalize “happy family” Facebook poster: I use Canva

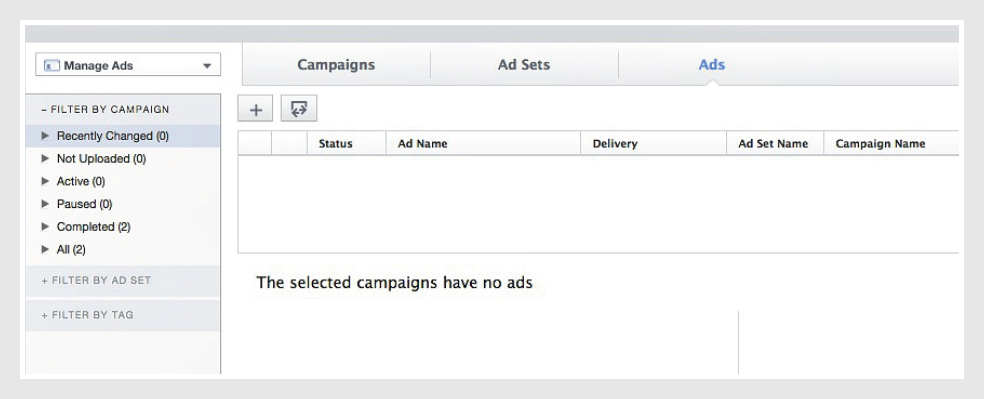
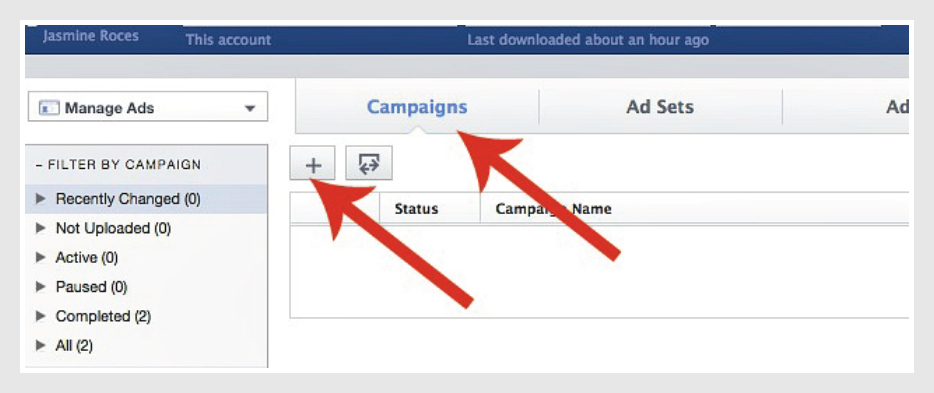
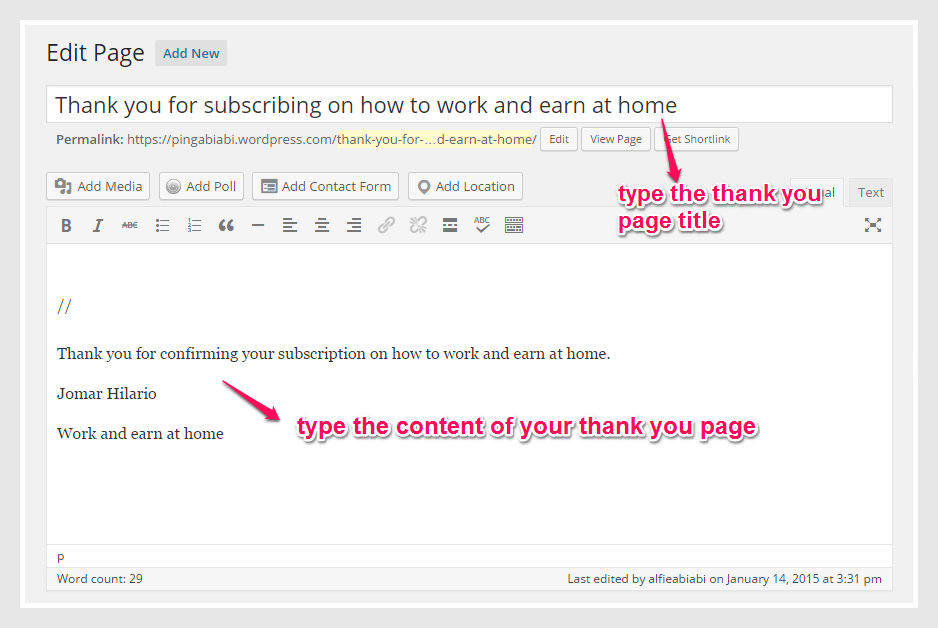
Wow, very early morning I woke up full of energy! I am almost done with my learning of VA 202 but more practice as what my mentor, Jomar Hilario told us to make more Facebook posters for ads using Power Editor.

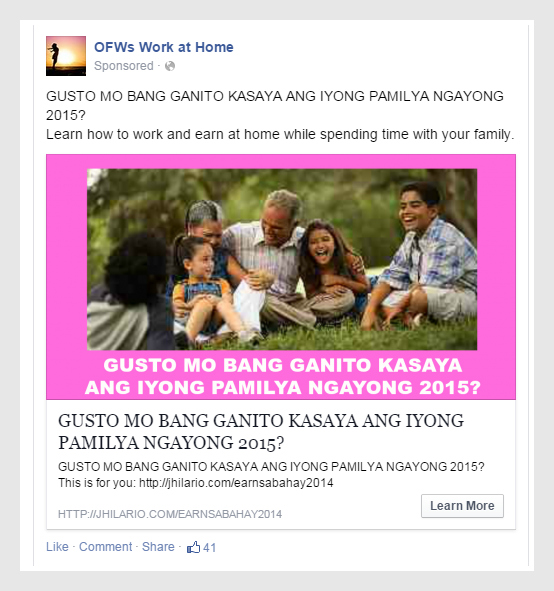
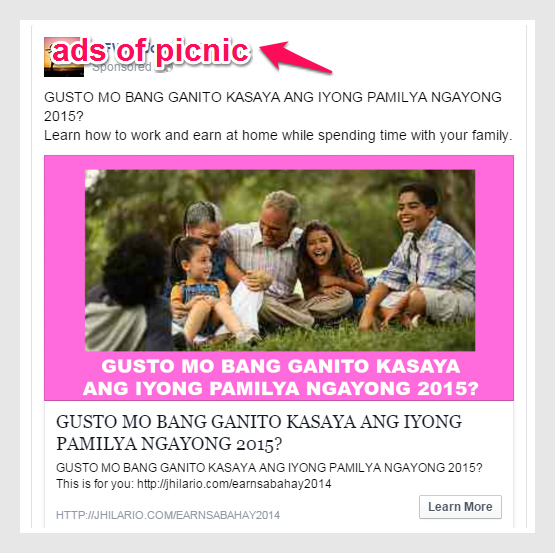
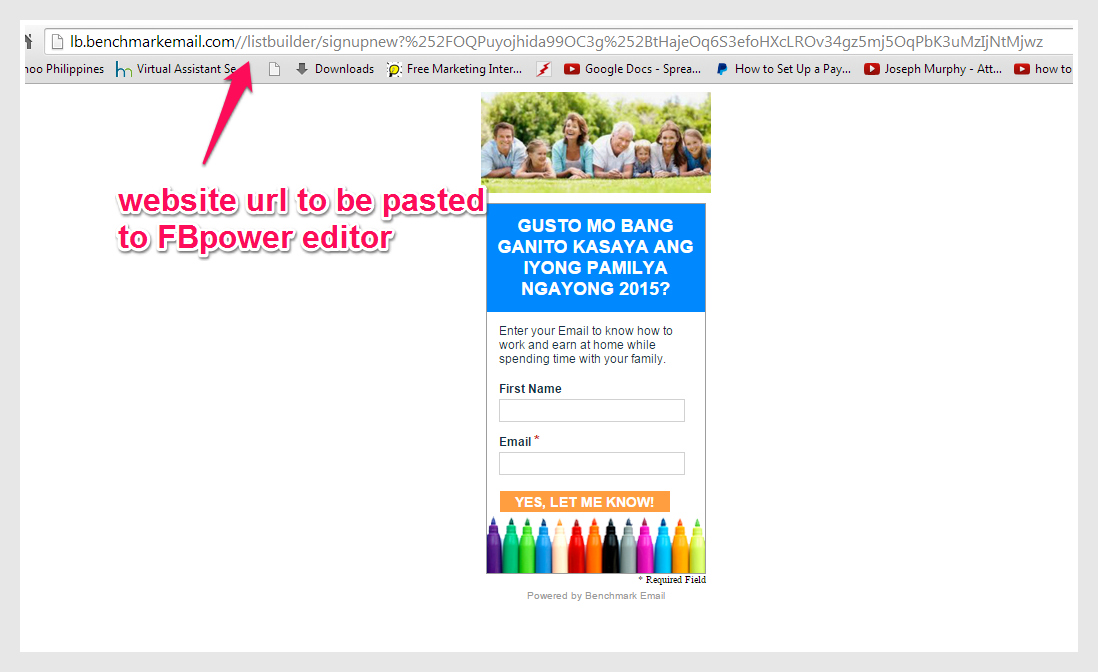
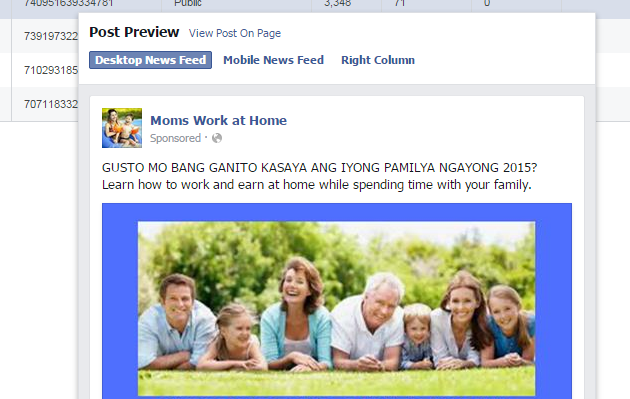
Here I personalize the “happy family” poster before posting this to Facebook Ads. This time I use canva.com site. I still use the same image but I have to change the text. As what Jomar Hilario said, you can personalize your Facebook ads by having the same images but different text or having the same text but different images. But still presenting the promise, of course to support the image.

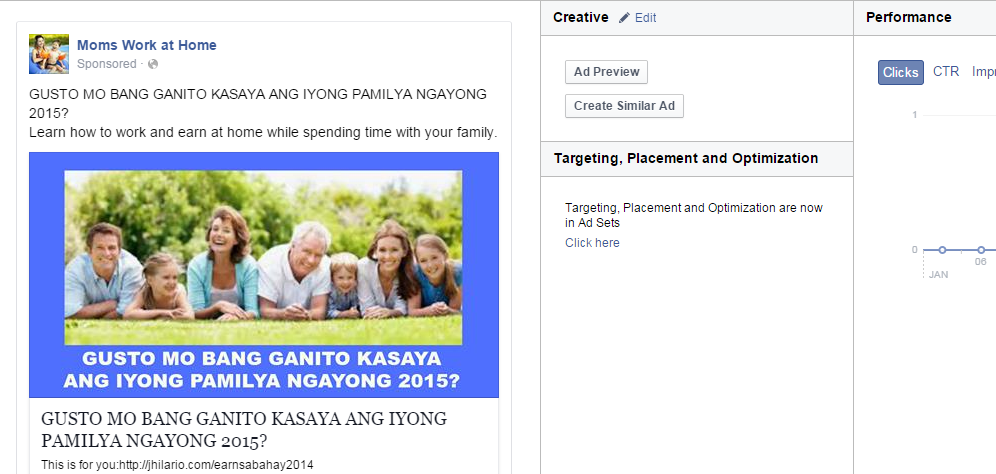
Here is the comparison: First poster is created by using picmonkey.com


happy family-FB ads-pic

This one is by using canva.com


happy family 2-pic

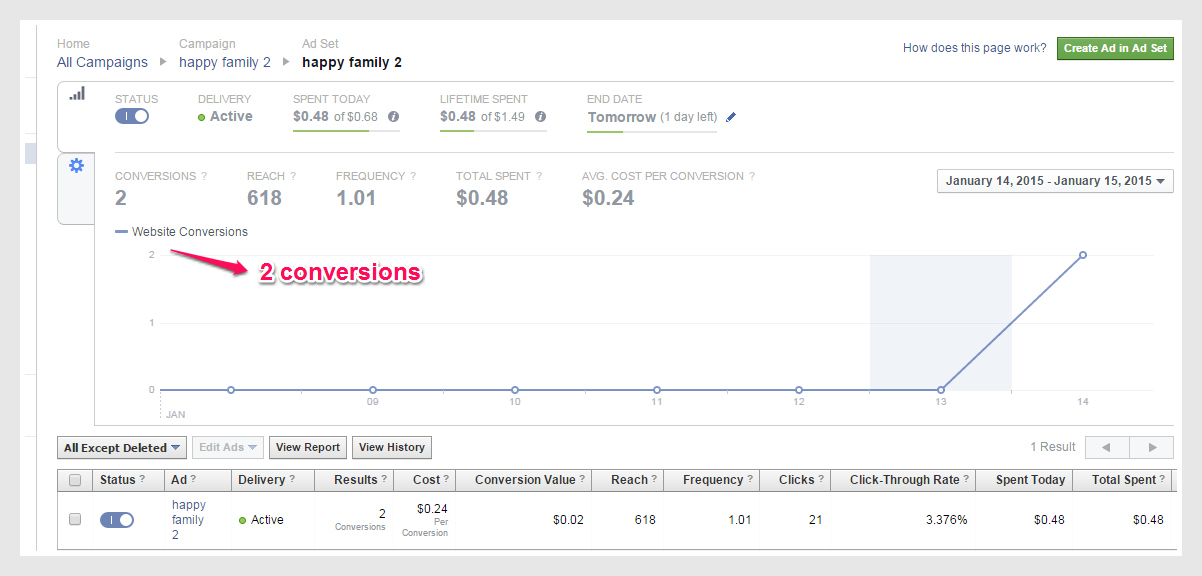
Notice that the images are the same. Only texts are different. This is one way to personalize your Facebook poster for ads in Facebook. For the next blog, I will share to you the other way to personalize and that is the same texts or heading but different images. And these images still support the promise which is the text. This strategy is shared to us by our mentor, Jomar Hilario. The purpose of personalizing the facebook poster is to compare the two posters and to know which poster garnered the most clicks and signups. If that poster got more clicks and signups, that means you have to extend the period of showing the ads to the public. More signups meaning you have more people to send emails as one way of marketing and the probability of more sales to come.

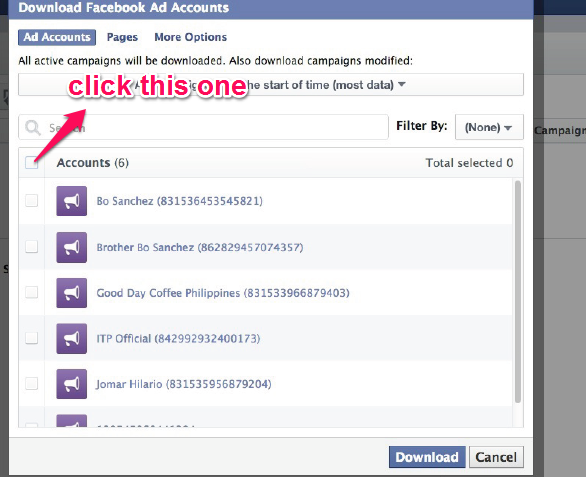
Now I will tell you how to create poster for Facebook ads using canva.

To create the poster for Facebook ads, go to canva.com


canva-pic


canva 1-pic


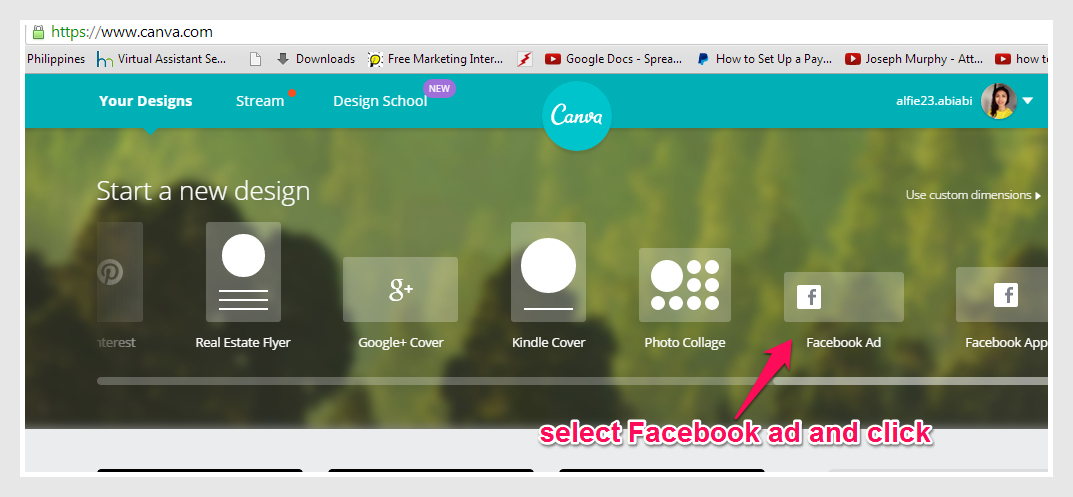
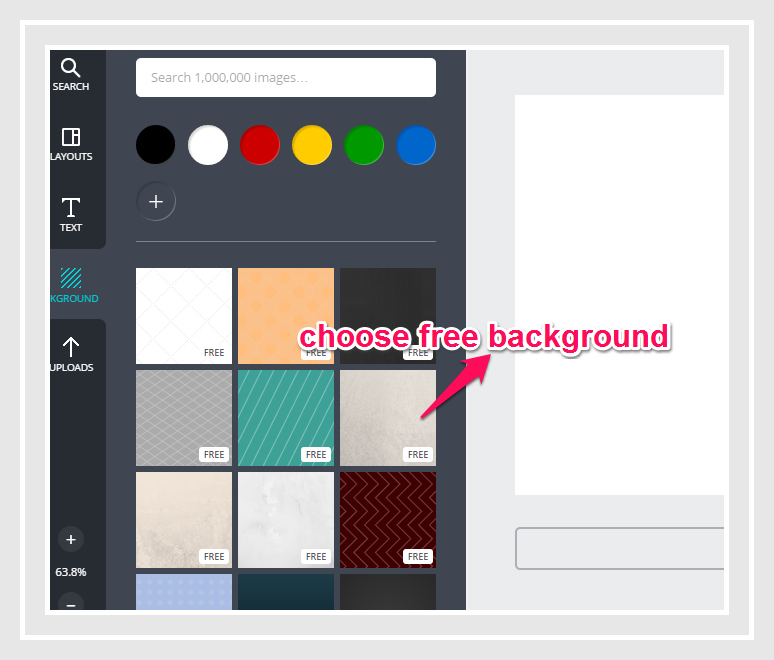
And now you are ready for making the poster. Inside the canva, click “Background” and choose design which is free to serve as background for your image.


canva3-pic

canva4-pic


After choosing the background, we are now ready to upload picture. Click “Uploads” and choose “upload your own images.”


canva 5-pic


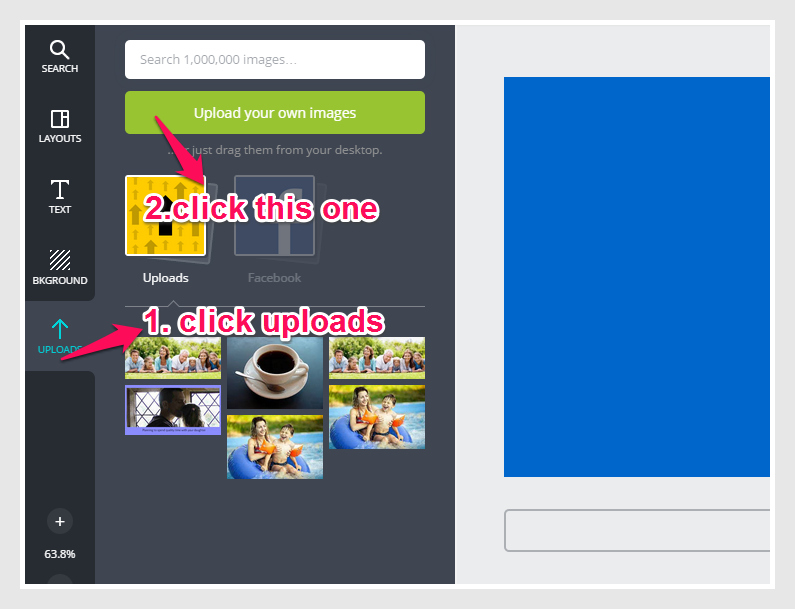
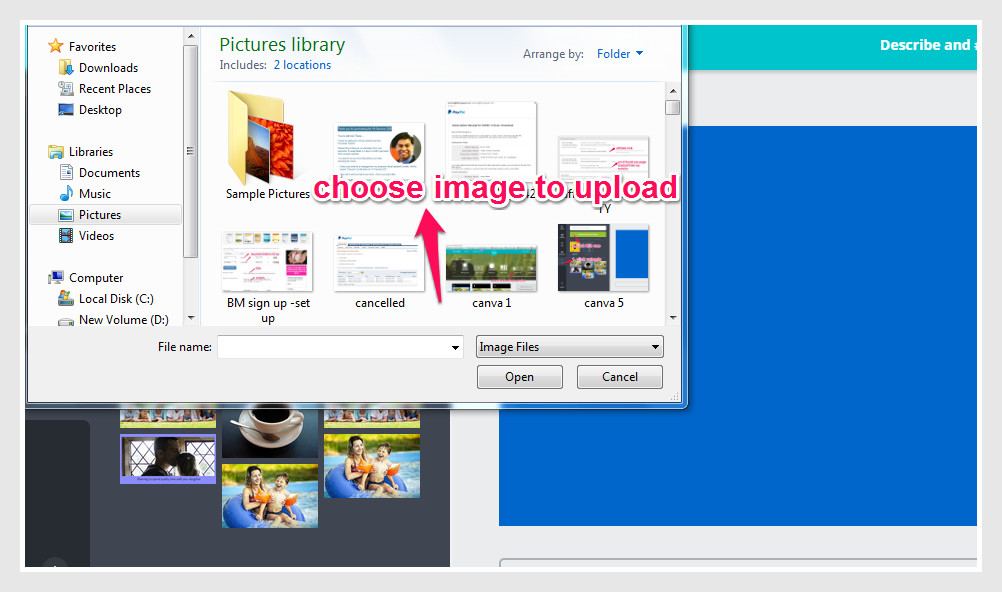
Choose picture to upload.


canva6-pic


Drag the arrow on the side to adjust the image to its desired size.
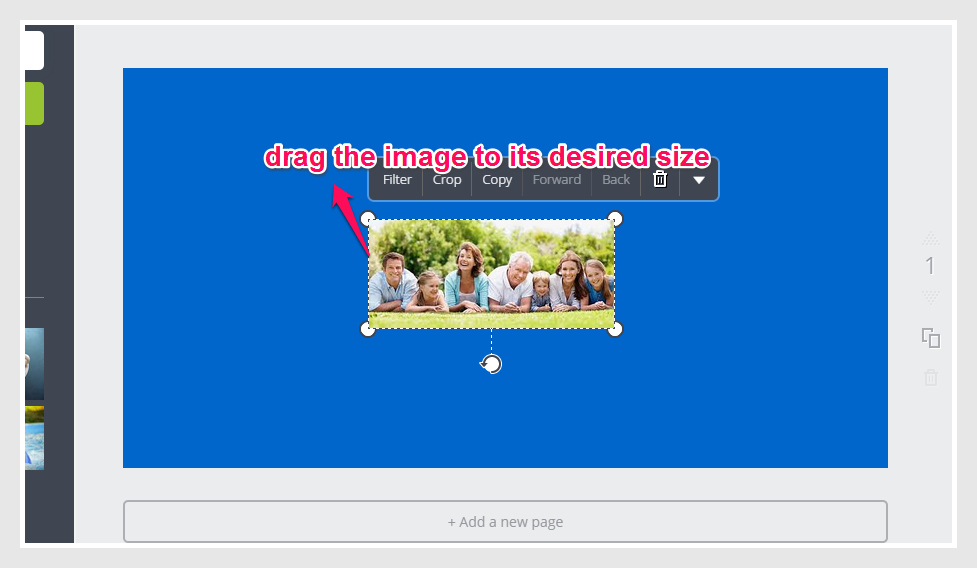
 

canva7-pic


There you have it!


canva8-pic


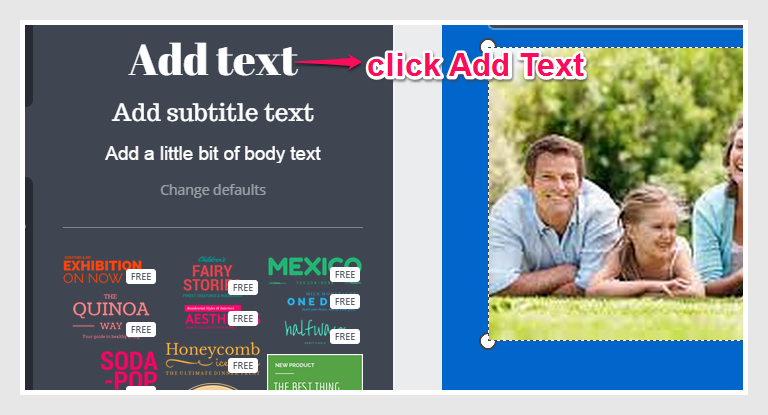
Next is to put text which is the PROMISE, under your image. Click “Text” to place the promise.


canva9-pic


canva10-pic


Type the  promise under your image. Adjust the text  and make it center.


canva11-pic


CANVA12-pic


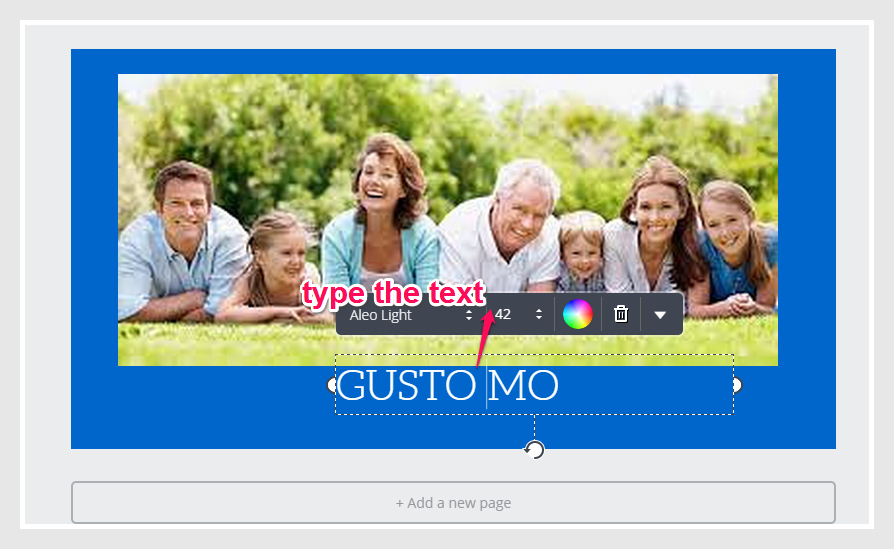
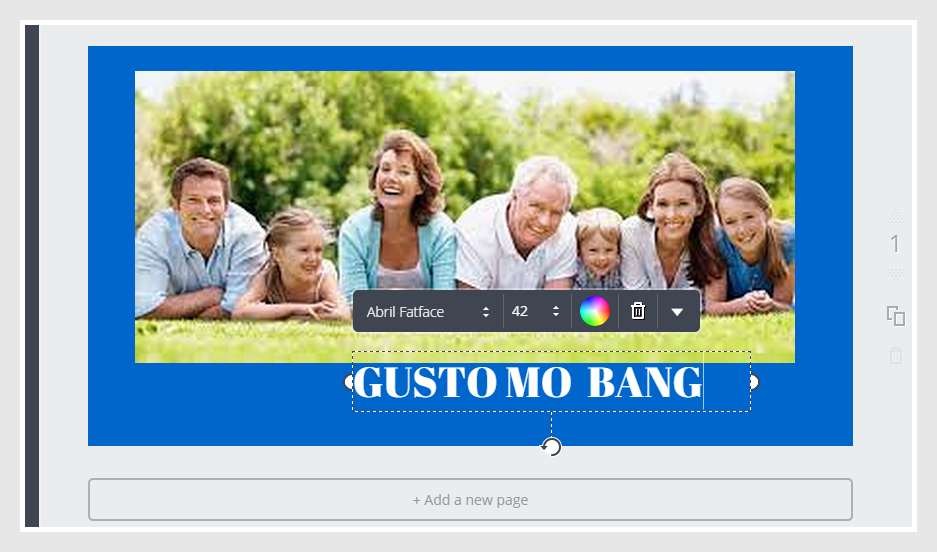
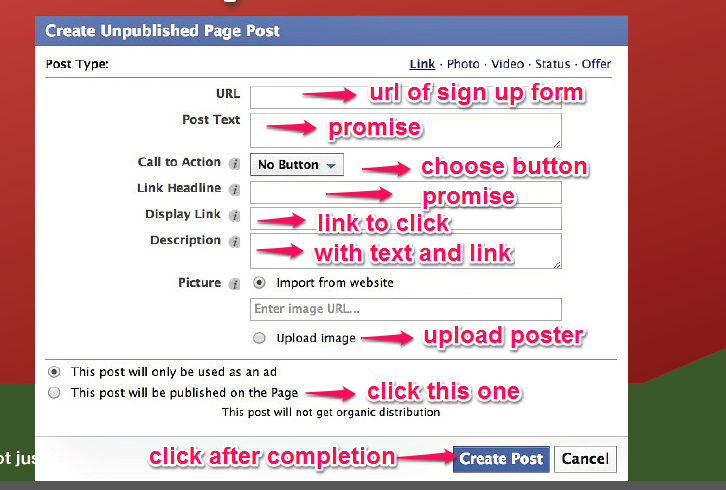
Here is the output for Facebook post.


canva13-pic


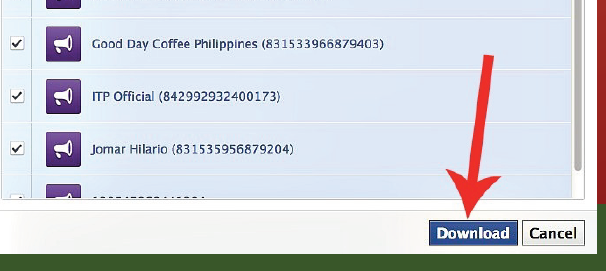
After creating the poster, we are now ready to save it. Click “Download” to save it in the computer.


canva14-pic


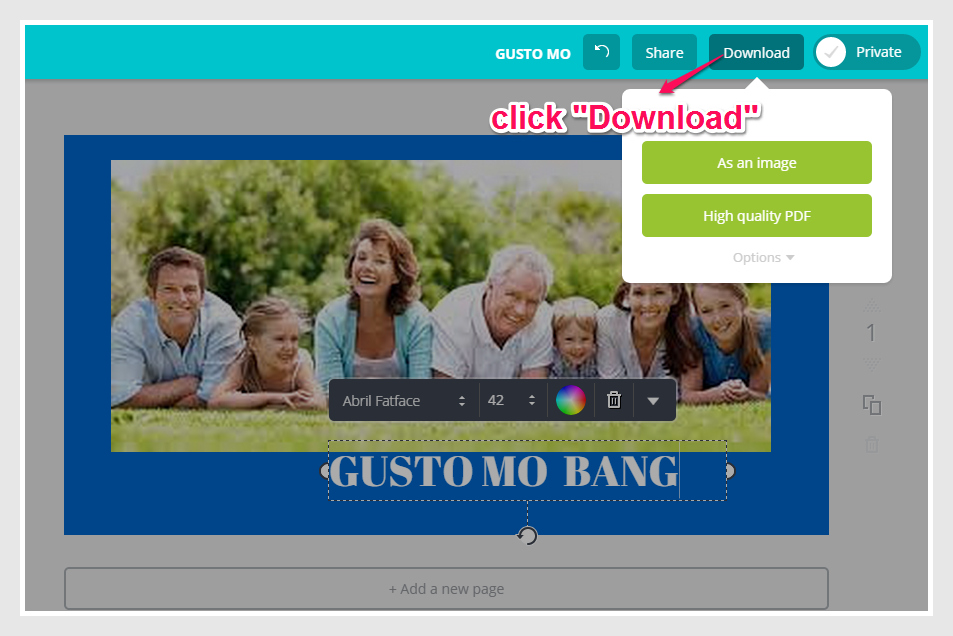
There we have the poster save for Facebook Ads! Yes, another way to create poster using canva! Great job!

The conversion of “Picnic” Facebook ads

Hi everyone! I will tell you the conversion of my “Picnic” Facebook ads.

To tell you, I made it wrong. I made a mistake. Instead of placing the url of “Thank you” page in the process of creating signup form, I placed the url of  signup form in the Confirmed Opt-in page portion.


picnic mistake-pic


When this ad was already running for 2 days, I wonder why  there were no conversions delivered though there were “Facebook likes” noted by number of people. So I decided to take a test. I entered my other email account and after confirming the subscription, I received the signup form instead of the thank you page.

Lesson learned, I did not check it many times. I overlooked it. I should not be in a hurry, instead I should be  very cautious in taking each step so to avoid delay and mistake. Result, zero conversion and I spent $2.53.


picnic conversion-pic


Although the ads had 41 likes, but still zero conversion.


picnic ads result-pic


Hmmm, realization, more practice! practice and practice!

So I decided to create it again and run only for 1 day as test ad. Here is the result:


picnic conversion2-pic


Not bad at all! This is only for just a day. I spent $.73 for the ad and got 1 conversion.

I have to practice making Facebook posters and do Facebook ads to master each step and that is the only way to master it. Always remember, repetition is the key to mastery. So, more Facebook posters and ads to make! Practice more Alfie!

I personalize my next Facebook Poster

Do you remember my latest Facebook ads that I posted in Facebook? The “happy family” ads.


happy family-FB ads-pic


This ads gave 9 conversions and spent $2.72 within 3 days. This time I made a revision. I personalized the ads by changing the image but still retained the same heading. Here is the output of the personalized Facebook poster.


picnic FB ads-pic

I changed the image but still the same heading compared to “happy family” ad. Here I still used the picmonkey.com in editing the image and placing the text. I made the signup form using benchmarkemail.com.

The website url of the signup form will be pasted in the Facebook Power editor when making Facebook ads.


picnic sign up form url-pic


I made the “Thank you” page from my website. This thank you page will appear after confirming the subscription in the email of the receiver.


hfamily signup6-pic


Then I named “picnic” to this second Facebook poster for experiment in my ads, ad set and campaign using Facebook Power Editor. This is to compare its result from the “original” ad which was the “happy family” that I posted before.


picnic ads-pic


This ad was approved by Facebook Ads team! Yes, I made it right. I will tell you on my next post about the conversion of this Facebook ads “Picnic.”

See you!

I made my Facebook Ads right this time

Truly I can say, patience is a virtue. If you find ways to have solutions to your challenges, you will find it. Truly indeed I had it and it worked! Yes, it worked! I made it right this time. Now I will tell you how I did it.

I made a correction to my Signup Form. I edit it, made a correct click on the button of these two important parts of Confirmation Settings in benchmarkemail. Remember my Signup form?


happy family sign up form-pic

Yes, this one. I made edits on the following: clicking the button under “Custom Thank You Page” and pasted the affiliate link. The other on was clicking the button under “Custom Email Confirmed Page” and pasted the url of the “Thank you” page of my website.


hfamily sign up1-pic

I still used the same Facebook Ads I created before.


happy family preview pw editor-pic

I made sure that I copied and pasted right the Facebook text code pixel in my “Thank You” page of my website.


happy family FB code conversion pixel-pic

I scheduled my ads to run from January 14, 2015 to January 15, 2015 to test it and here is the result:


happy family 2 conversion rates-pic

Tsaran! haha and now I made it right! Yes, 2 conversions in one day! Meaning 2 people entered their email addresses!  I even emailed Ms. Lyn Nafarrete and told her about the result and she told me that I made it right! Yes, you are so good Alfie!

And now I extended the ads schedule from January 14 to January 17, 2015. As of today, January 17, 6:41 AM here in Philippines, here is the result:


happy family 2 day 3 conversion-pic

Yehey! Good job alfie! 8 conversions for 3 days! This means that 8 people entered their email addresses within 3 days! I spent $2.22 for the ads and the cost per conversion is $.28. Wow! you made it right! Keep practicing and practicing!

The verdict: First Experiment of Posting FB ads

Hey, how are you there? Well, I am here again to tell you now this moment about the result of my First Experimental Facebook Ads. Let the drum start rolling!

Ehem! I don’t know what to say. But I have to tell you that my experimental ads has Zero Conversion. huhuhu!


happy family ads report-pic

The amount I spent for test ads is $.60. Well not bad after all it was just a test ad. I analyze where I got wrong with the process and I found out two things: The affiliate link and the Thank you page where the Facebook pixel code is placed.

You remember my Signup form I presented in  my previous blog?


happy family sign up form-pic

It is in the process of pasting the affiliate link and the “Thank You” page link that I went wrong.


hfamily sign up1-pic

I did not properly click the button that is why it went wrong. So at least I learned my mistake and the most important thing is that I analyze what went wrong. So the next time I will create another Facebook Ads, I will pay attention on this.

Still good job Alfie! Make it right next time. There is always second chances!

Facebook Campaign:First Experiment

For the next level, this is creating Facebook Campaign. We are done with our Facebook ads so let us start to roll the drum!

For this level, there are objectives and goals to consider:

How much to spend for this ad? Preferably $1.00 a day for ads testing

When will our ads start and end? For ads test especially for the first time, I suggest use 1 day or 24 hours. After all it is just a test to see if what you have done is correct. This is also to save your cost of ads testing.

Who will see your ads? You consider your prospects or audience for your ads like this ads is for moms, single parents, what country, age bracket and etc.

So I will share to you what I did to my Facebook campaign.

Click from the left side, “Back to Campaigns.”


fb ads 16-pic

You will see like this one below:


fb ads 17-pic

You click “Campaigns” and “+”.


fb ads 18-pic


fb ads 19-pic

Your campaign name, ad sets and ads should have the same name for easy identification. You can also include particular “persona” like for OFWs, moms, single parents, employees, etc.

For campaign objective, choose “Website Conversions.”


fb ads 20-pic

The main objective is “Website Conversions” and this only matter. This is because conversions = you get emails or conversions = you get sales. Then after you click “Create.”

Then next is for Ad sets. This is where to set the budget, the schedule and the type of audience to engage in your ads. For the budget, consider for the start is $1.00 daily and set when to start and when to end the ads. For ads testing, I suggest using 1 day only since it is only for a test run. For audience you can select the preferred audience you want, the age bracket, etc. For placement of ads, choose Desktop and Mobile instead to better view your Facebook Ads.


fb ads 21-pic

For the ads, click “Ads” and click “+” Then you will choose what page to post your ads and click “Existing Post.” This is the post I previously created.


fb ads 24-pic

Then click “Create Pixel.”


fb ads 25-pic

This Facebook Pixel code is to be pasted to “Thank You” page from your website. Like this one below:


fb ads 26-pic

This code is very essential because this will track how many persons enter their email addresses or enter their sales interest. This conversion code track is also seen when your Facebook ads is finally approved by Facebook and is running wherein this will show how many click and send emails or make sales.

After completing this process, you need to click “Upload Changes” to save your work.


fb ads 27-pic

The ad is now pending for review. You will see “Pending for review” if it is complete. Then you will receive email from Facebook ads or notification telling that your Facebook ads is approved like this one that I received:


fb ads 28-pic

Yes, at last I received it! It is approved! So the ads will be ready to run and be seen by audience! Yeheey! Good job!


See My Facebook Ads: First Experiment

Hey, you wonder I called this one My First Experiment? Yes it is! Since November 2014, I started practicing making Facebook Posters and Unpublished Facebook Ads. The VA 202 course was introduced to us last November but before that we had scheduled webinars given to us by our mentor, Jomar Hilario. He wanted us to associate with making Facebook Posters and unpublished ads so that it would be easy for us to make one once the formal seminar course started.

And yes, I made numbers of Facebook posters. I did experiments but not fully the whole process. I just focused first in making and creating Facebook posters and unpublished Facebook ads to master it. In this month of January, I decided to fully grasp the whole process by practicing and doing it and of course with the guidance of Ms. Lyn Nafarrete, an intern of Jomar Hilario. It is so good to hear that we have groups of people to guide in making this course successful.

So here is my experimental facebook ads.


happy family preview pw editor


Before this, I went to https://www.facebook.com/ads/manage/powereditor  for creating Facebook Ads.


fb ads PEditor

Click “Download Power Editor.” Then you will be directed to this (picture below). Just click the “Accounts” from the image shown below:


fb ads download

And click “Download.”


fb ads click download

You will see like the one below:


fb ads 6

Then a message telling ” The selected campaigns have no ads.”


fb ads 7

On the topmost part from the left, click the drop down box and choose to click “Manage Pages.”


fb ads 8

On the left part, you will see your pages. You select what page to post your Facebook Ads.


fb ads 11

Then you click “Create Post.”


fb ads 12

I will show to you my post in Moms Work at Home page:


fb ads 13

Here is the guide to create like this one from above:


fb ads 14

After completing the process from above, you will see like this one below:


fb ads 15

Click the space after the half moon to preview the post. Like the one below:


fb ads 13

And now you have your Facebook Ads! Way to go! Good job! Try this one and practice practice practice!


Requirements: How to create Facebook Ads through Power Editor

Hi everyone! We are now in the part of making Facebook Ads. Before, upon introducing VA 202 course of Facebook marketing and Linked marketing, Jomar Hilario, our mentor already shared to us steps and insights of the process of how to create Facebook Ads. He presented the process through webinars, interactions by creating posters and assignments to truly incorporate it in our minds so that when the actual day of VA 202 seminar, this will be easy for us to grasp and understand what Facebook and LinkedIn marketing is. But in this blog, we will only first touch Facebook marketing.

As you noticed, I presented to you on how to make posters first in my previous blogs. The two important things in making poster for Facebook Ads are the “Promise” and the “Image” supporting the promise. These two should go hand in hand and in fact, should be consistent. Meaning, if you tell the promise, the image also supports the promise. Always remember the consistency principle in making Facebook posters for Facebook ads. It is just easy to remember, like what I said before, the “PITCH” shortcut for Promise, Image, Text, Call to Action and Headline, all presenting the promise and supports the promise.

Before making Facebook Ads, let us have a checklist. Of course, you should have the poster , the signup form and the thank you page ready, including creating the Facebook page as you will use this one to post your Facebook Ads to be seen by your preferred audience.

To use the Facebook Power Editor, go to http://facebook.com/powereditor. Here are my requirements needed in making Facebook ads.

Requirement number one: Facebook Poster


happy family-FB ads-pic

I made this poster using the site http://picmonkey.com. Refer to my previous blog for guidance or you can browse the said site for details. You can see the Promise here, “Gusto mo bang ganito kasaya ang iyong pamilya ngayong 2015?” meaning “Do you want your family to be as happy as this in this year 2015?” And of course, the image that supports the promise which is the picture of a happy family. For free photos, I use pixabay.com or corbisimages.com

The Requirement number two: Email catcher.


happy family sign up form-pic

This email catcher is made through http://benchmarkemail.com. You can access this site free and it has tutorials for guidance in making signup forms or email catchers.

Requirement number three: Facebook Page


facebook page1-pic

The facebook page should be created for your prospects. It does not matter the name as long as it catches the attention of  your preferred audience like moms, dads, single moms, OFWs. Like this one, I named my Facebook Page as “Moms Work at Home” because I want to cater moms who want to work at home. To create facebook page, go to http://facebook.com/pages/create.php and name it well. Name your page using personalized promise so that your audience or your prospects will like it because of the name. Your audience does not care your business name as long as the name is likeable.

Requirement number four: Log in to your personal account or to your business.facebook.com account.

Below is my example of Facebook Ads


happy family preview pw editor-pic

Below you can see the parts of the Facebook ads. The PITCH, presenting the Promise, Image, Text, Call to Action and Headline, which supports the promise. This should be our goal in making Facebook Ads.


happy family PITCH-pic

Hey, this is just the beginning! We are not done yet. This is just an introduction of the requirements before making an official Facebook Ads. And the important thing is we have to practice making Facebook Ads in Power Editor, many many times. The next time we want to make it, it will be just one two three! Good job Alfie, a well done job!

My Thank You Page in my website

Hi guys! Now I will share to you how easy is to create a “Thank You” page in your website. Yes, using wordpress!

The first step is to go to your wordpress dashboard and click “Pages” and click “Add New.”

The next thing is to type the thank you page title and its content like this one I created below.


thank you page1-pic

After creating the “Thank You” page, publish it.

Do you remember what I told you in my previous post that the Facebook Ads pixel will be pasted in the thank you page? Well, after publishing it and creating the Facebook Ads from Power Editor, go to TEXT and paste the FB pixel code just above the content of the thank you page. See below.


thank you page2-pic

After pasting the FB code pixel, publish it to make it permanent. The essence of placing the Facebook Code Pixel is to track how many click the subscription link they received from their emails. Meaning, the number of people who entered their email addresses and confirmed the subscription by clicking the link. The number of conversion through registration is seen in the Facebook also, which later on I will share to my post.

Below is my Thank you page that I created.


hfamily signup6-pic

See I told you, it is very easy to create “Thank You” page in your website. You will also feel confident to see your output! Keep practicing so that later it will be very easy for you to create “Thank You” page.

Signup Form Page in your website

Creating Signup Form page in your website is easy as one, two three! If you are using wordpress site, that is much appreciated because I am using it also.

So let’s start the ball rolling!

Go to your wordpress dashboard and click “Pages” and click  “Add New” to create your Signup Form page.


sign up page1-pic

Type the title of your signup form page like this one:


sign up page2-pic

From the benchmarkemail, copy and paste the signup form text code and paste it in your signup form page of your website, under TEXT.


signup page 3-pic

After pasting the text code, click Publish. After publishing, you will see your signup form page like this one that I made.


sign form page 4-pic

See, it is easy right? yeah! So pat your back for the job well done!