Use Excel For Graph’s Presentation

This blog teaches you how to convert spreadsheet data into graph in Microsoft Excel.

  1. Open your Microsoft Excel program.
  2. Click Blank Workbook on the top left side of the template window. Screenshot 2018-02-04 21.40.07
  3. Enter your date into the spreadsheet.Screenshot 2018-02-04 21.40.16

Enter the Name of the Company, months of sales, the sales amount and the items sold. On the left, you can see the items sold then followed by the corresponding sales amount per month.

5. Click the area of data to be included for the graph presentation.

Screenshot 2018-02-04 21.45.05

6. Then click Insert from the top most part and choose what kind of presentation or graph you want. Then click it.

Screenshot 2018-02-04 21.45.19

Screenshot 2018-02-04 21.45.28

7. Drag the graph near your data.

Screenshot 2018-02-04 21.45.49

Now you have a simple graph presentation of your data as easy as 1, 2 and 3!

How Intuit Quickbooks Can Help You As A Business Owner

Quickbooks is the world’s #1 cloud accounting software for Small Businesses and  Self-Employed.

Intuit also offers a cloud service called QuickBooks Online (QBO). The user pays a monthly subscription fee rather than an upfront fee and accesses the software exclusively through a secure login via a Web browser. Intuit provides patches and regularly upgrades the software automatically.

As of May 2014, QuickBooks Online had the most subscribers for an online accounting platform, with 624,000 subscribers compared to Xero, which reported 284,000 customers as of July 2014.

The cloud version is a distinct product from the desktop version of QuickBooks, and has many features that work differently than they do in desktop versions.

QuickBooks is an excellent accounting software to use for a small business. This is great for a small business owner that doesn’t necessarily understand accounting because many of the accounting entries are done behind the scenes in QuickBooks just by carrying out the day to day activities of the business. (from slcbookkeeping.com)

There are several ways that Quickbooks gives great benefits to small businesses:

1. Cash Flow Management.

QuickBooks can be a great tool to help you manage your cash flow. Instead of using your online bank balance you should keep your QuickBooks file updated regularly and understand how to use it to manage your cash flow. By entering your financial transactions often and doing daily reconciliations in Quickbooks you will get a great management of your cash flow. They say, “Cash is King,” and so management is.

2. Send Invoice to Customers.

You can send invoices to your customers anytime you want by emailing them directly from Quickboks. You can customize your messages before sending their invoices.

The big benefit of invoicing your customer anytime you want is that you can inform your customers right away and this will help decrease your accounts receivable and increase your cash flow.

3. Create Bills and Manage Accounts Payable.

By entering your bills to your vendors with the correct terms and due dates can keep you on track of your payables. Thus, keeping your vendors and suppliers happy. Because you don’t want to fall behind on your outstanding bills with vendors.

Just use the entered bill and pay bills functions in QuickBooks. Pay directly through QuickBooks via online bill pay or printing checks will reduce unnecessary data entry and increase productivity.

4. Manage Employee Time – You can enter employee time from the employees’ section of the home screen. You can enter a single time event or use a weekly timesheet. Tracking time in QuickBooks can help measure employee productivity and can prove to be valuable for job costing purposes.

5. Customized Chart of Accounts – Your QuickBooks chart of accounts is all about your needs and should be customized to those specific needs. I often see clients make their chart of accounts so complicated that the reports become meaningless. Make sure your chart of accounts speaks to you and provides you with valuable information that you can use. Don’t worry too much about tailoring your chart of accounts to your taxes; it should be more geared towards helping you run your business.

Many small business owners look at bookkeeping as a hassle or as a means to filing their taxes. I think some small business owners simply don’t like bookkeeping, others are intimidated by it and some don’t see the value in it.

If your bookkeeping system and QuickBooks file are set up properly and tailored to your specific needs, they can help you run your business.Maximize the benefits of using Quickbooks for your business because this is the best tool to aid you in making important business decisions.

How to Create a Landing Page using Thrive Theme

Last March 2016, our mentor, Jomar Hilario conducted webinar on how to create landing page using Thrive themes. The first time I attended, I just watched the flow and listened every step of the way. No notes at first. That time, I felt like I was a beginner, though I already know how to create landing pages. But this one, this is different because Thrive themes had unique, beautiful and captivating designs. And for me, using thrive theme is so easy. Even a beginner can do this instantly because it is designed for common users.

Part of our online course in blog monetization is to create a tutorial. To tell you, I was just sitting in front of my laptop, and staring at my screen. I was biting my fingernails and wondered how would I start to do  this. Then an idea popped up. Since there was a recorded webinar and I already bookmarked the link, well guess what? Yes, you were right.

This would be the process. Watch the webinar replay again and again and take notes of the important steps of the process flow.  After watching, practice creating landing page and create tutorial after doing  it.

I watched the replay. I watched it 3 times in a row and while watching I noted important steps from creating, down to the very output of the process. Then, I created one landing page for experiment then I got confused. I had to watch the replay again to get the very part where I got stuck. Then went back again to my experiment until I finished the whole process. Through constant repetition, I did finish one output.

Guess what? I was able to finish a tutorial about how to create landing page using thrive themes! It felt so good that I was so happy seeing my output. Though it was difficult, I could feel a sense of completion within me because I was able to overcome the thought of “I cannot do this.” But I did! I overcame fear. And I changed fear with faith.

So fellows, after browsing through the tutorial, do it for yourself. This is so easy step- by- step and I am sure you will enjoy the beauty of using thrive themes especially creating landing pages.

Write you again, soon!

Best,

Alfie

Webinar: How to Create a Sales Page Like a Pro- An Interview

Hi Guys!

It’s me Alfie again. I would like to share to you something. I was a webinar guest last Monday, February 15, 2016. The webinar interview was all about “How I Created A Sales Page” for my client.

This interview is very helpful for you, new VAs out there to know more about the tips on how to create  a sales page. Click the link below to get access to it, or else this will disappear soon! Grab the opportunity of learning now! Don’t take this for tomorrow, but NOW!

More learnings soon!

Happy Learning!


http://www.vooplayer.com/videoplayer/fb/fb.php?v=79190

How to Create a Sales Page like a Pro

Hi guys!

I hope you have a great day today! Anyway, this will be another learning series on how to operate your business in the internet, automatically. See, another learning curve to discover. Hey! This is just the beginning. Let’s explore and have fun!

Creating sales page is one of the best skills to learn. Find the video below to uncover the secret on how to create”sales page” like a pro.

Thanks to my VA friend, Nath for the effort of creating this video:-)

Ajah!

Facebook Custom Audience: Website Custom Audience

Hi there!

I am back again sharing to you my few experiments in Facebook Marketing. Sorry for taking so long because I have many clients to attend their needs though I always want to share my learning as I do Facebook exploration.

This time I will share to you how to create Website Custom Audience or WCA.

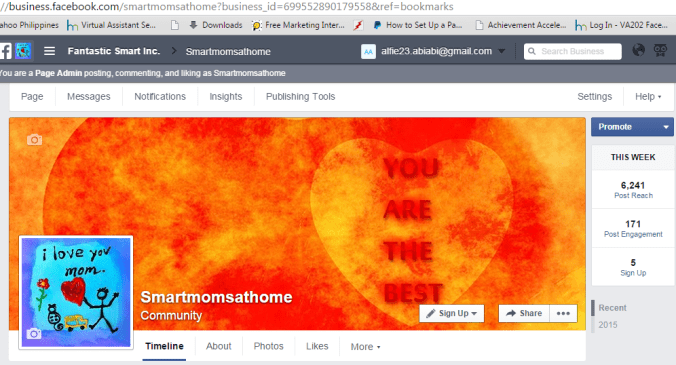
To start with, you must have a Facebook Business Page. Here is my Facebook Business Page:


wca1

Then on the upper right side you see the blue part with word “Promote,” there is a drop down menu. You click “Go to Ads Manager.”

wca2

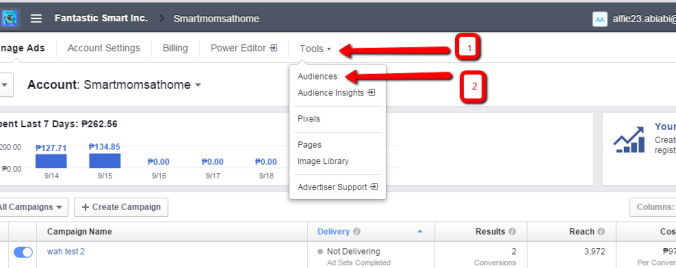
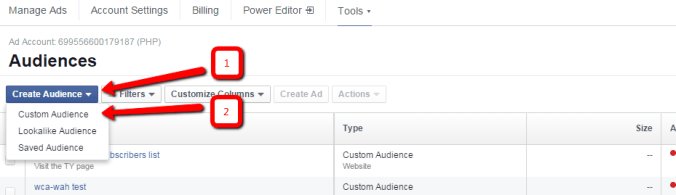
The next step is to click  “Tools” and click “Audiences.”

wca3

On the Audiences page, you see the “Create Audiences” tab and click it. A drop down menu lists the following:

  1. Custom Audience
  2. Lookalike Audience
  3. Saved Audience

Click the “Custom Audience.”

wca4

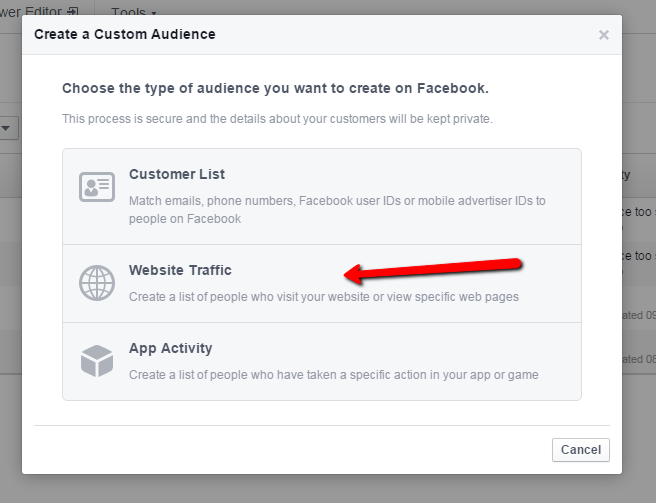
A pop-up appears and lists the following:

  1. Customer List
  2. Website traffic
  3. App Activity

Click “Website Traffic.”

wca5

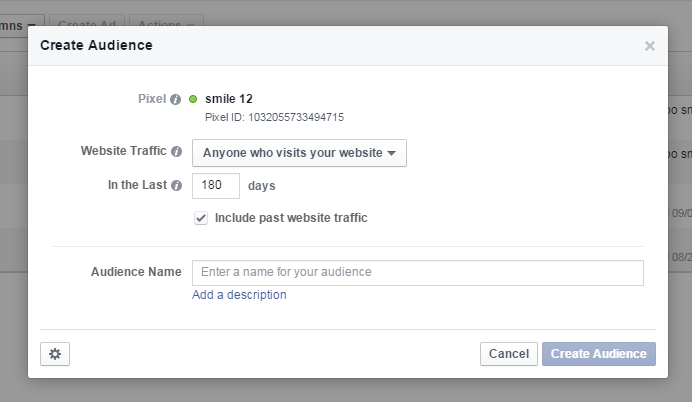
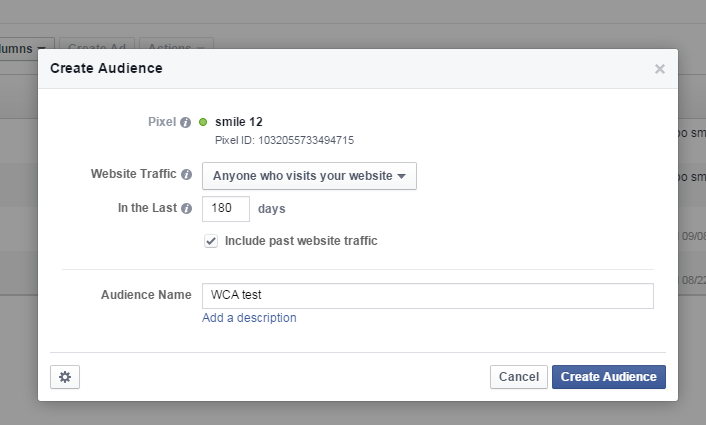
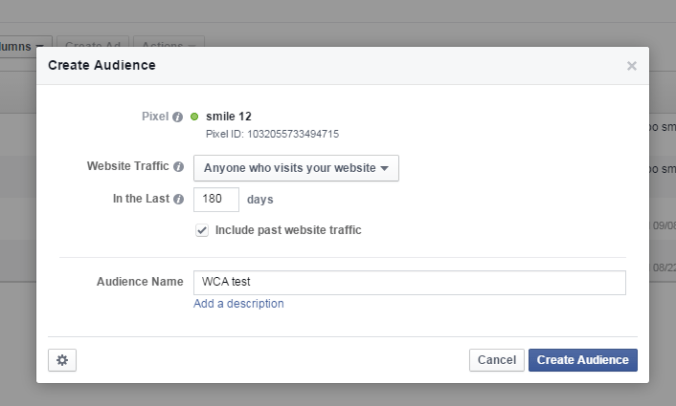
Then a pop-up appears.

wca7

Here, you can see, pixel is being set up. On Website traffic, a drop down menu lists:

  1. Anyone who visits your website
  2. People who visit specific web pages
  3. People visiting specific web pages but not others
  4. People who haven’t visited in a certain amount of time
  5. or Custom Combination

Here, we choose “Anyone who visits your website.”

wca7

Now the number of days can be set from 30 to 180 days. We just set here 180 days.

wca8

Then we place an audience name on it. Or you can add a description below its name.

wca9

Below on it, you can see a “Gear” icon on the lowest left part. Click it to view the pixel. Copy the pixel code and paste it to your website pages.

wca10

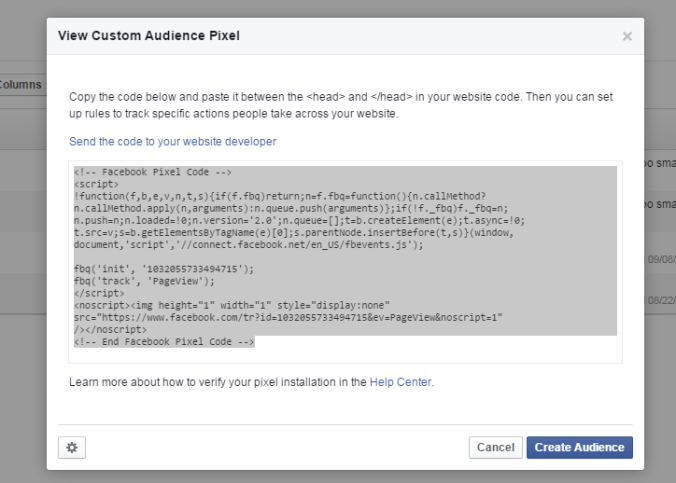
Then after that, click “Create Audience.”

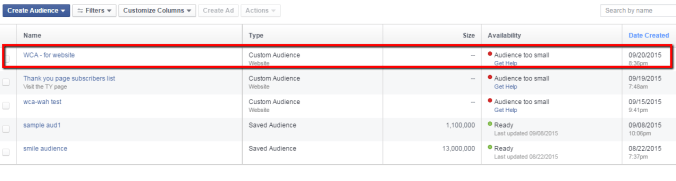
Below, you can see our created audience for Website custom audience. We will just have to wait for the number of visitors to increase, up to 20 people before we can create an ad targeting them.

wca11

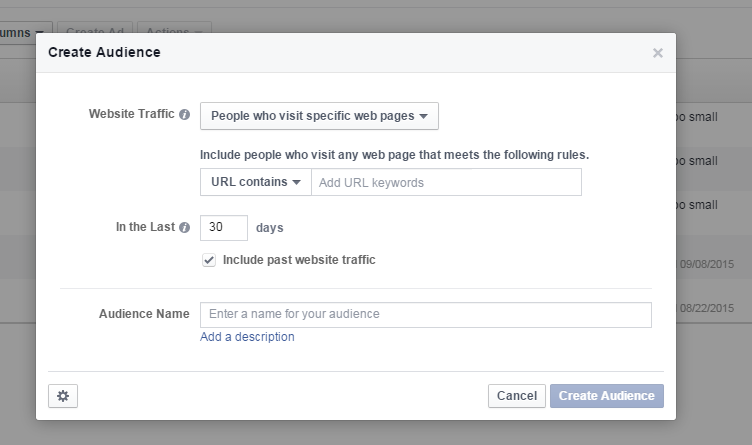
See, it is very easy to set up a Website custom audience. This is one way of retargeting the audience who previously visited your web pages. We can set up also an audience who visit specific pages by inserting “url.”  We will choose the option “People who visit specific web pages.” Then we will place the pages that contains or equal to certain url.

wca12

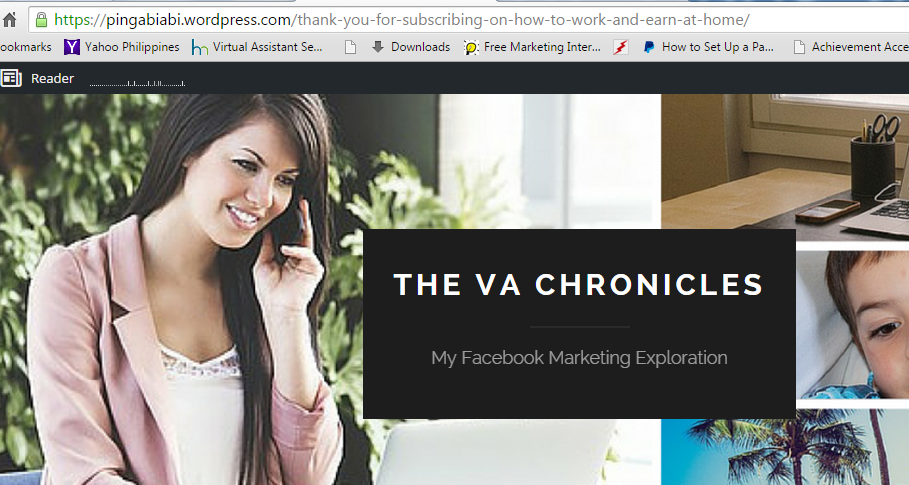
We will choose a certain website page, like our “Thank you” page. The url: /thank-you-for-subscribing-on-how-to-work-and-earn-at-home/ will be pasted.

wca13

wca14

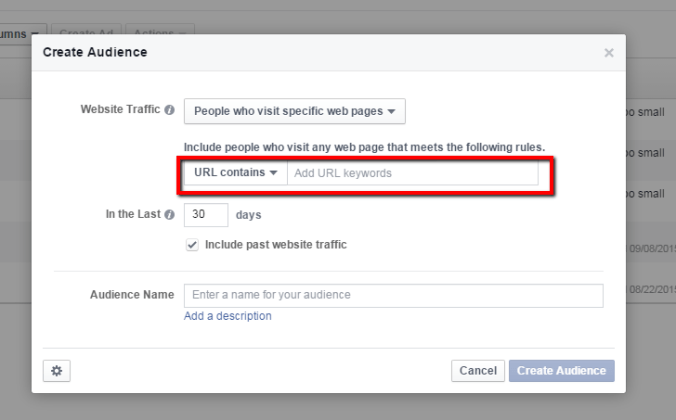
Then paste the url. Set up the number of days from 30 to 180 days. Then name the audience and you can add description.

wca15

Then click the “Gear” icon and view the pixel. Copy and paste the pixel to the desired website pages that is connected to the url being set up.

Now, all you have to do is to wait to increase the number of visitors to 20 and you can create an ad to them.

See that is how easy to set up a Website custom audience. Then I will be sharing to you again my next exploration.

Thanks!